How to create a match?
Updated on 15 Apr 2026
What is needed?
A login in TeamTV as a ‘trainer’.
Goal:
To create a match for analysis.
Once the match is created, you can then Upload the video (immediately or later).
Step 1:
Click on “Create Match” in the match overview.
The following screen will appear:
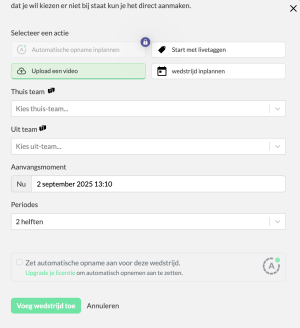
At the top of the screen there are four options. They differ slightly, but all of them will create a match.
- Schedule Automatic Recording
If your club has a TeamTV automatic camera system, you can use this option to schedule a recording. - Start with Live Tagging
If you choose this option, you can only create a match for the current moment (live), and it will go directly to the live Tagging page.
(Of course, it is also possible to create a match first and then go to live Tagging afterwards.) - Upload a Video
If you choose this option, you can create a match and then go directly to the ‘upload’ screen, where you can Upload the video of the match. - Plan a Match
This is the most commonly used option. You create a match that will take place tomorrow or in the coming week.
Once you choose one of the options, you can continue creating the match.
IMPORTANT:
When entering the teams, the system remembers previously entered teams.
It is important to REUSE those teams by selecting them, instead of entering a new Team name.
This is crucial for statistics and the players linked to that Team (entering the same Team name again is treated by the system as a completely different team, even if the name is identical).
If you haven’t entered anything yet, your own team (the one linked to your login) will appear at the top of the dropdown.
See the image below as an example with DVO 1:
- Image
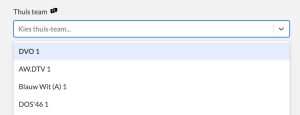
👉 Always choose your own Team shown at the top!
All of your players are linked to that team, which is important if you want to tag and add players afterwards.
Finally, select the correct date and time and click SAVE.